Wednesday, August 18, 2021

Linksys Velop AC3900 Setup

 Linksys Velop AC3900 setup in two simple steps


We can't fathom our lives and jobs continuing without wifi or the internet. We now all rely on the internet for education, employment, pleasure, and other purposes. People, on the other hand, become upset when their router delivers a sluggish internet connection.


Everything in this new environment, including your work performance, is dependent on speed. So, why do we overlook internet speed and compromise on it? The majority of people nowadays have issues with sluggish internet.


The Linksys Velop will be discussed in this article. In addition, you will learn how to set up the Linksys Velop ac3900.


What is the Linksys Velop wi-fi mesh system and how does it work?


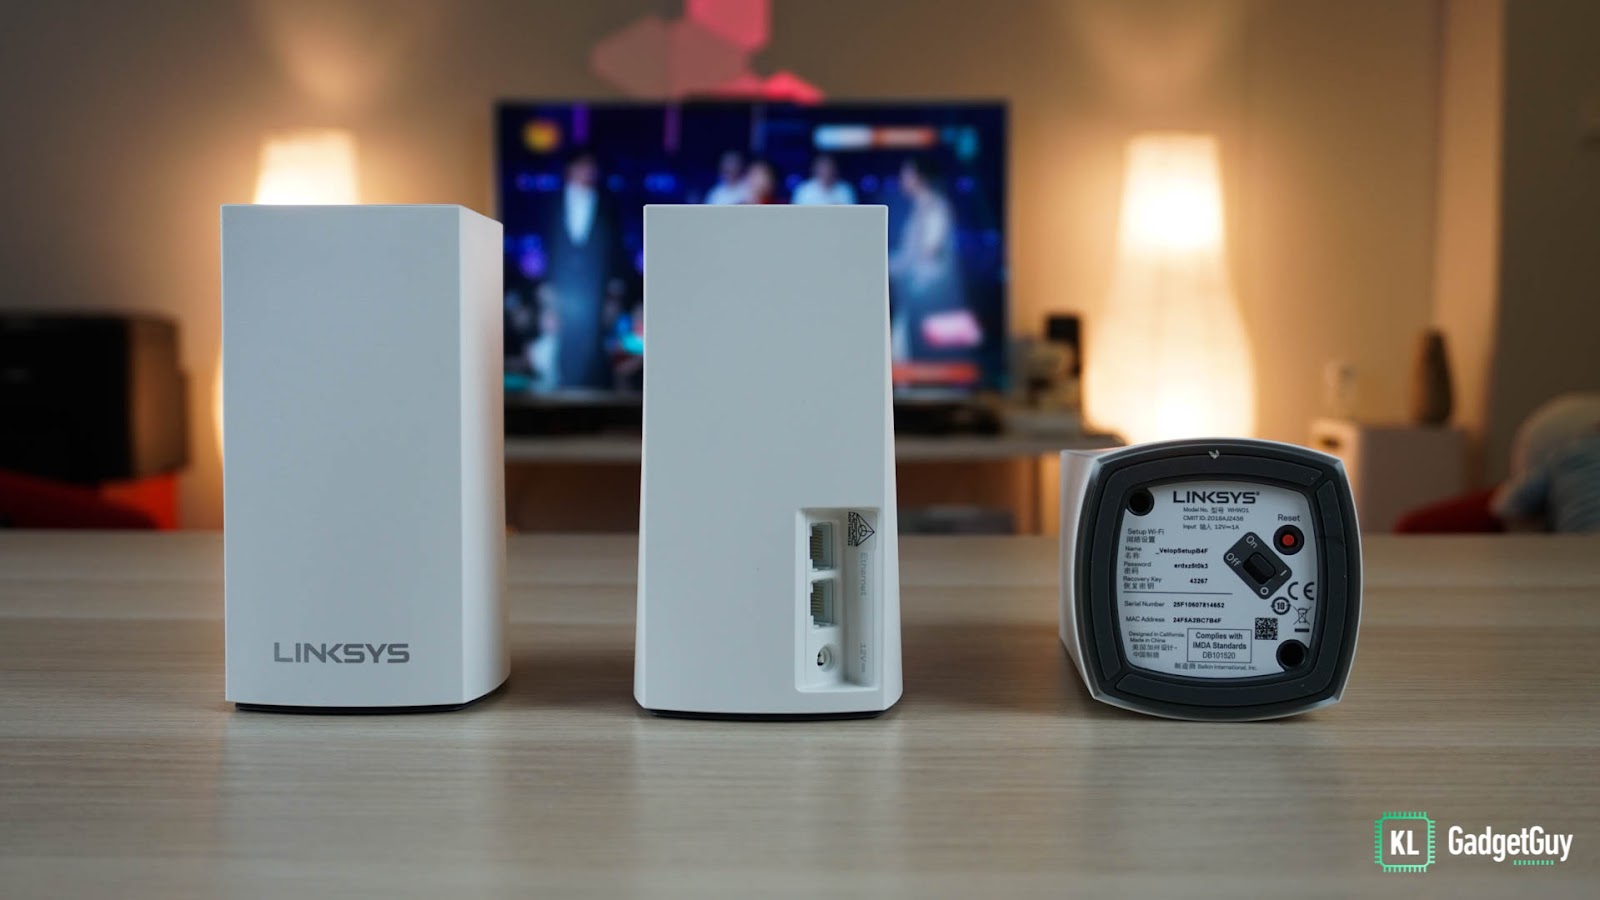
Before we go into the Linksys Velop AC3900 Setup, it's important to understand what a wifi mesh system and Velop are. The Linksys Velop is a modular wifi mesh system that generates nodes to offer high-speed wifi coverage across your house.


It will just take a minute to set up, so there is no need to be concerned. It produces an ultrafast, faultless, and full-strength signal after the setup. The primary router in a mesh wifi system is directly connected to the modem.


In addition, a number of nodes and satellite modules are strategically installed around your home to provide high-speed, all-area wifi coverage. The Linksys Velop is available in a variety of packages, including one node, two nodes, three nodes, and so on. As a result, you can purchase these bundles based on your needs.


Linksys Velop AC3900 Setup Page Login Methods


There are several ways to set up the Linksys Velop wifi. Here you can find a list of all the techniques available to you based on your device.


Initial Linksys Velop AC3900 setup connections


You'll need an active internet connection to set up Linksys Velop. When using a conventional Linksys router, you must first connect your laptop or computer to the router to begin the configuring process. When it comes to the Linksys Velop setup, though, you won't need a PC or laptop. A mobile device can be used to complete this configuration. You can quickly set up the gadget using that software. Here are some instructions for setting up Linksys Velop's first connection.


  1. The Linksys Velop Setup may be found in any app store. You must establish an account after finishing the download and installation.


  1. Connect the Ethernet cable that came with the device to the Ethernet port and internet modem on the Linksys Velop. The power cord must be plugged in to turn on the gadget. A blinking blue light will appear when the node is turned on. When the flickering blue light becomes solid, the node has been turned on and is ready to function.


  1. Perhaps you've previously purchased node packages, such as one, two, or three node packages. You must first set up the main node. The modem will be attached to this node.


Linksys Velop AC3900 setup through Linksys app


The software makes it simple to set up the Linksys Velop ac3900. You only need to follow a few basic steps, which are as follows:


  • Download the Linksys app and open it, then touch the launch setup button. Following that, you will be presented with a number of alternatives from which you must choose the Velop system.


  • To accept the terms and conditions, click the Linksys extender setup button. Only one instance of the phrase and condition will show.


  • Because you must turn on Bluetooth on your phone to set up the system, you must first turn on Bluetooth on your phone. It's possible that you'll need to switch on the location as well.


  • The Linksys Velop Ac3900 Setup software will now scan the network for the primary node and attempt to connect with it until it finds it. After you've made a successful connection, move on to the next step.


  • After that, you'll notice the opportunity to establish a Linksys cloud account, so enter your email address and password to create an account and go to the next page. In all other situations, if you have an account, you should use it to log in.


  • After that, you'll notice the opportunity to alter your wireless network settings. The name of your network will be the SSID, and you will just need to set a password to join to the wifi network. You must keep track of the settings you've altered. Next, press the Next button.


  • Your phone is now connected to the wifi you set up. Return to the Linksys app and complete the setup procedure. Choose the main node's position. A family room, workplace, dining area, or other space might be used. When the setup is complete, you will receive a success message.

Thursday, April 8, 2021

Dodocool DC39 Extender Setup

 Dodocool DC39 Extender Setup


For wireless networks, Dodocool is a network extender. It's obvious what a Wi-Fi network extension is and why we need one. Wi-Fi extenders enable us to use our smartphones in locations where the network isn't accessible, such as our homes or offices.


The home routers on offer aren't just for providing a strong and dependable wireless signal in the home. This will be made simpler with devices like the Dodocool DC39 Extender Setup wall-mounted wireless range extender setup. It will only be accessible to the farthest reaches of the buildings.


It has a wireless transmission rate of 300mbps over 2.4 GHz wireless N(802.11n) and can transmit data up to 100 meters. Due to the dual integrated antennas, wireless performance and reliability are enhanced. The Dodocool dc39 extender rig can be configured in a variety of ways.


Dodocool DC39 Extender Setup  with ap.setup


  • The DC39 extender is ready to use when it is connected directly to the electric green light terminal.

  • To link to your Wireless-N network, tap WiFi on your phone or tablet. The Dodocool Extender network is known by this name by default.

  • The chrome-form IP address is 192.168.10.1, or simply type ap.setup into the address bar.

  • On the DC39 extender Setup page, use the username and password "admin."

  • Scanning begins with the network list shown on the screen. Select the key wi-fi network from the list and enter the password.

  • The configuration will be enforced for about 50 seconds before being reset. You're going to make an internet connection. The Extender can also act as a router for your home network.


Dodocool DC39 Extender Setup via  WPS method


  • The extender must be wired to an electrical outlet.

  • They must be held in the same location as your router. The Dodocool dc39 extender is ready to use when the green light blinks.

  • Check to see whether your dc39 extender is in the correct mode, such as router, signal repeater, or range extender mode.

  • Within 2 minutes, click the WPS button on your router and then the WPS button on the New Range Extender Setup. A Dodocool WPS button is located on the side of the extender.

  • On the extender, both the WPS indicator and the router are blinking. The dc39's Wi-Fi light will also remain solid until it is activated.

  • You may also use this extension to link your device to a location without internet access.

  • It's possible that setups are a pain in the ass.

  • Setup of the Dodocool Wifi Repeater:


There is a snag, and it is a big one. There's a catch, and it's a big one. There's a catch, and it's a big one. The good price and features come with a catch, and it's a big one. The manual will teach you how to use the DC39's repeater feature in a number of ways to get a Wi-Fi signal. If the DC39 can detect a signal when it is opened, configuring it through an Internet browser is easy. It's not a jumble, but it should be the most straightforward choice among the options in the manual.


The simplest way to make an opening is to click the extender reset button and then the router's WPS or repeater button. It won't take long for the extender to pick it up. This can also be a pain if someone's router is in an inconvenient place. In 2017, it should be a no-brainer to be able to customise the extender using a smartphone.


Wifi Extender Setup is a service provider that is self-contained. Unless otherwise noted, the use of trademarks, logos, products, or services is merely descriptive, and Wifi Extender Setup has no association with any of the companies. The services we offer may also be available on the websites of the brand owners.


Thursday, October 8, 2020

Rockspace Extender Setup


Rockspace extender  Setup

Rockspace local wifi extender serves as a repeater for wider locations where wireless communication is necessary to improve the signal and prevent it from the deadzone region. Basically, the local wifi extender re.rockspace runs on the 2.4 G band, offering maximum signal coverage with a propagation speed of 300 Mbps. AC1200 wifi range extender is also available that operates with dual band and improves the range and pace of wifi signal by improving your home network. To set up the router link, you only have to push the WPS button and the link to expand the signal would be built within a few seconds. Similarly, the package includes a reset button by which the wifi extender can be returned to its default settings. Until the symbol turns red, the reset button has to be pushed.


Rockspace  Ac1200 Extender:

The Rockspace AC1200 Wi-Fi Range Extender reduces dead zones in your home by increasing the Wi-Fi signal of the router and expanding coverage up to 7,500 Sq. Ft.-Ft. Cross-band technology is used on the RockpsaceAC1200 Extender Setup, which absorbs data on one band and transmits on another, resulting in a better, more reliable signal in your house. The Range Extender links seamlessly to your established network.

Spot Finder Technology tells you where to put range extenders for optimum results using any mobile device. It comes with Wi-Fi Audio, which helps you to attach a stereo or amplifier to the range extender and download music instantly from your mobile device or monitor. It will operate with any router, indicating the router settings do not need to be changed. The Simultaneous Dual Bands (2.4 and 5 GHz bands) minimize traffic and optimize broadband bandwidth and enable data transmission of up to 300 Mbps on either band.


Rockspace AC1200 extender Setup :

v  AC1200 with Rockspace

v  By following the measures listed below, the Rockspace AC1200 can be configured:

v  You need to have the key router network's SSID and Wi-Fi password to launch the configuration. And you need to plug the Re.Rockspace.local to the power outlet that fits.

v  You need to have the key router network's SSID and Wi-Fi password to launch the configuration. You then need to insert the Rockspace AC1200 extender into the power outlet that fits.

v  Open any tab on your computer after accessing the configuration and check for the default IP address by typing AP.Setup or re.rockspace.local.

v  Log in now by typing admin as the password and the system will do a search for the available networks after this. Pick the primary Wi-Fi network from these networks.

v  Now, obey the directions on the page by which the extender is successfully linked to the router network


Saturday, September 19, 2020

Wavlink AC1200 Setup


 Wavlink AC1200 Setup: Progressively improve your wireless network with the aid of a dual band wireless range extender from Wavlink Extender Setup. This enables you to enjoy a trouble-free location with a extremely compact and versatile build. 


In addition, its elegant style helps it to seamlessly fit in with your current home or office decor. 

 Easily expand the coverage of the current wireless network everywhere with Wavlink ac1200 setup wireless range extender. Four antennas are mounted in a special and proprietary omnidirectional setup to boost and make the current network more secure. 

 The high- performance antennas let you attach all your devices from every corner of your home. In addition, Wavlink AC1200  Extender setup attaches to your router wirelessly. So it detects the router 

signals immediately and begins enhancing it.


 Step for Wavlink ac1200 setup

·         Next, mount your Wavlink wireless range extensor to a reliable power source. To do this, the power adapter is connected to a power outlet near your router. 

·         Make sure the wires are coated correctly. Make sure there is a bright blue light showing 

that the extender was successfully powered on.wavlink ac1200 setup 

·         Now you must connect the extender to your router. To do so, you need to concurrently push both the WPS button on your router and your extender. Please note that you do so with in two minutes or the devices will not connect. 

·         Make sure the signal Lead turns to solid blue once more. 

·        This means both systems were linked successfully. Now you can take your Wavlink ac1200 setup to the next level. 

·        If all devices are successfully linked, the extender can nstantly detect your wireless router 's signal. The extender will then boost the network once it has been found.In addition,both the extended and standard networks would use the same SSID as well as the same password. So just connect to your current password and you're okay to go. AP.Setup


Friday, September 11, 2020

Installation guide for the Wavlink extender Ac1200 setup via ap.setup

Wavlink extenders are the best to increase the speed of the main wifi router and eliminate the dead areas which lack wifi signals. Wavlink extender setup provides the range of 750 sq.ft., so, let’s begin. 

Steps to configure wavlink ac1200 extender setup:


  • First of all, the extender has to be switched on and make it accessible

  • Connect your Ap.setup to a reliable power supply by attaching the adapter to the electrical socket. After that, keep a watch on your extender's LED to make sure it's stable.

  • Now, you have to click a side button of your phone. Switch it to the repeater mode until you click it.

  • Once again, keep an eye on the near LED of wavlink extender setup

  • and check that the light is steady.

  • Then, you have to locate your router next to the wavlink ac1200 extender setup. Making sure all machines are not too far apart nor too close to each other.

  •  Maintain a decent gap between the two devices for the maximum coverage area.

  • After that, get your computer or mobile and access your wireless manager. You will enter a network with the name of the wireless-N network.

  • When you have successfully signed in, open a window and navigate to the URL bar. Enter the ap.setup website in the URL bar. When done, tap the enter key on your keyboard to visit the site.

  • When you're on the website, you will be prompted to enter your login info. Only type "admin" in both the username and password sections of new extender setup and press login button.

  • Finally, after you log in successfully, the website will navigate you via an easy setup request. Just obey the on-screen directions and finish the installation.

Thursday, September 10, 2020

Configure your wavlink extender setup using ap.setup

 Ap.setup will help you to improve or enhance current wifi signals in dead spots and remove the areas. Victony WiFi Extender Setup allows you to play HD videos and movies and experience lag-free gaming comfortably and deliver the best performance. Below is the process to install the wavlink extender so you can avoid wasting your time.


Step by step instructions to Ap.setup:


  1. Plug the Wavlink Extender for Ap.setup into a power socket nearby the router.

  2. Switch on your Wavlink extender setup and stay till the LED is stable.

  3. Select either of your WiFi enabled devices and connect to your Wavlink network. Go to the Wi-Fi network and connect to the network.

  4. Open the browser of your preferences and enter the username and password  for wavlink http:/ap.setup in your browser. .Press the enter button

  5. Please provide the login details of the Wavlink Extender in the required fields and press 'Login'

  6. Choose from the ap.setup page and click on the new home Wifi network and enter the wifi network address.

  7. You need to type the WAVLink Extender Network Wi-Fi name and password on the next tab.

  8. Then press the  'Save' button to apply the settings.

  9. AP extender setup via is successfully completed and then you will be able to enjoy fast internet service.

  10. Still unable to install the  wavlink extender setup? Don't panic, our free support team helps you to easily install ap.setup and fix your problems in a few minutes.